Subtotal $0.00


Email :206
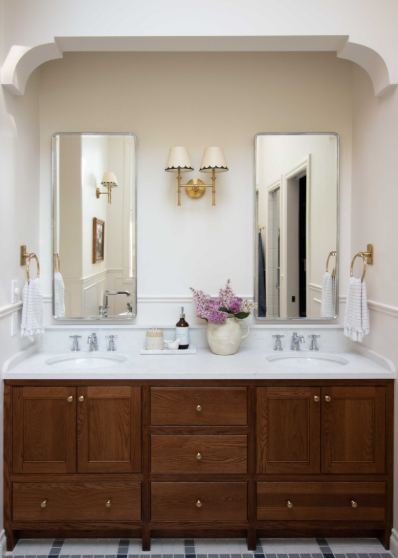
If you’ve been following along, you know I’m not exactly thrilled with my kitchen, but today, we’re focusing on a different area of the house—our kids’ bathroom. To be honest, it took me longer than I’d like to admit to finally tackle this project, but I’m excited to share the results. The main goal was simple: upgrade the counter from one sink to two to better suit our family of five.
Our kids’ bathroom was functional, but it was definitely in need of a makeover. The old vanity was basic, and with three kids, having only one sink just wasn’t cutting it. We really needed the extra space, so we decided to dive into a DIY project that would keep costs low and still give us the bathroom we wanted.
Step 1: Consult a Plumber
Before jumping into any renovation work, make sure you hire a reliable plumber, especially when it comes to plumbing changes like moving from one sink to two. Trust me, this step is essential. I didn’t make it a priority at first, and it nearly backfired. After getting a few quotes, one plumber gave me a solution that seemed impossible, while the second one turned out to be a lifesaver. He reassured me that we could achieve the two sinks without having to rip out the entire vanity, which was a huge relief. Always get a second opinion when it comes to plumbing!
Step 2: Choose the Right Countertop
After the plumbing was sorted, the next big step was finding a new countertop. This part of the process was a bit frustrating, but worth it in the end. I initially considered picking up a pre-made double sink counter from Home Depot, but after realizing our vanity dimensions were odd, I had to go a different route. I didn’t want to replace the entire vanity because I didn’t want to deal with additional issues like replacing the floor or tiles. Instead, I focused on swapping out the countertop and making cosmetic changes. Ultimately, I went with quartz, replacing the original quartzite after it didn’t work out.
Step 3: Modify the Vanity
Once we had the countertop ready, it was time to modify the existing vanity. Our old vanity only had one sink cutout, but now we needed two. This part of the project made me nervous, but with the help of my dad and some power tools, we carefully adjusted the vanity to accommodate the new sinks. It wasn’t easy, but it was definitely manageable.
Step 4: Paint the Vanity
To freshen up the look of the vanity, I decided to paint it. I went with Benjamin Moore’s Knoxville Gray, a great color that gave the vanity a modern yet cozy feel. I also decided to spray paint the original hardware gold for a quick and affordable upgrade. It’s a simple way to refresh your hardware without buying new knobs.
Step 5: Paint the Walls
Once the countertop and vanity were in place, it was time to paint the walls. I opted for Simply White by Benjamin Moore, a fresh, bright color that would make the new vanity pop. While I wouldn’t recommend white paint in a kids’ bathroom due to maintenance, it worked perfectly for the look I was going for.
Step 6: Shop for New Accessories
This was the fun part! I needed a few new accessories to complete the makeover. I swapped out the old mirror for two smaller mirrors, which I’m thrilled with. It created a more balanced look and even provided some much-needed storage. For the light fixture, I went with a long, black vanity light to cover both mirrors, and I even installed it myself (with my dad’s supervision, of course). The matte black finish complements the new vanity beautifully.
For the faucets, I chose matte black as well, keeping the look modern and sleek. I didn’t overthink this part—sometimes you just need to go with your gut and choose what feels right. I also found a cute rug that brought in a pop of color and added comfort to the space. It was actually a kitchen runner, but it fit perfectly in the bathroom and had non-slip backing to keep it in place.
Lastly, I added a few plants to the bathroom, opting for a hanging plant to save counter space. This was an easy and effective way to add some greenery without crowding the counter.
Final Thoughts
While there were a few bumps along the way, I’m so happy with how the bathroom turned out. The addition of two sinks made a huge difference, and the cosmetic changes—from the vanity paint to the new accessories—really brought the space together. If you’re looking to make over your bathroom on a budget, I highly recommend taking a similar approach: focus on keeping the core elements, like the vanity and tiles, and work on the details to refresh the space.