Subtotal $0.00


Email :225
There’s something undeniably magical about cooking outdoors. Whether you’re grilling burgers, preparing wood-fired pizza, or just enjoying the fresh air, outdoor cooking takes the experience to a whole new level. If you’ve been thinking about creating your perfect outdoor kitchen, this guide will help you bring your vision to life, no matter your budget.
Step 1: Plan Your Outdoor Kitchen Layout
Before you dive into picking appliances or choosing materials, take a step back and assess the space available. Consider where you want your kitchen to go—maybe it’s a cozy nook on your deck or a spacious corner of your patio. Think about factors like how much sunlight the area gets, whether it’s shaded, or if it’s exposed to wind or rain.
Ask yourself a few key questions:
- How frequently will I be cooking outdoors?
- Will I host large BBQs, or do I want something more low-key for weeknight meals?
- Do I need plumbing and electricity, or would I prefer to keep things simple?
Answering these questions will help guide your choices, whether you opt for a sleek built-in setup or a more flexible, standalone kitchen.
Step 2: Select a Foundation for Your Outdoor Kitchen
The foundation of your outdoor kitchen largely depends on your plans and budget. If you’re building something permanent, a concrete slab, pavers, or even a sturdy wood deck can handle the weight of appliances. For a simpler setup, a flat and level patio is perfect for modular options that can be moved and adjusted as needed.
Modular kitchens are increasingly popular, offering versatility with mix-and-match cabinets, portable islands, and carts. You can start small and add features over time without a complete overhaul.
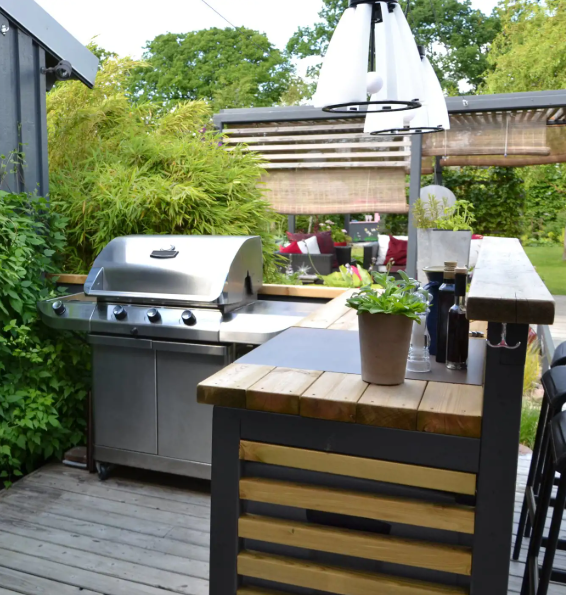
Step 3: Invest in the Right Grill
The grill is the centerpiece of your outdoor kitchen, and if there’s one thing you should splurge on, it’s the grill. It’s where all your meals come to life, from perfectly seared steaks to smoky grilled veggies.
Not sure which grill suits your needs? Here’s a quick guide:
- Pellet Grills: Perfect for slow cooking with a rich, wood-fired flavor. Some models come with digital controls for convenience.
- Charcoal Grills: If you prefer hands-on cooking and love that smoky taste, charcoal is the way to go.
- LP Gas Grills: Great for fast, even heat, making them ideal for quick meals during the week.
- Natural Gas Grills: These connect directly to your home’s gas line, so you never have to swap out tanks—just turn the knob and cook.
- Pro-Style Grills: For those who want top-tier performance, these grills offer restaurant-quality heat and features like sear zones and rotisseries.
Explore trusted brands like Weber, Wolf, and Lynx for high-quality options.
Step 4: Equip Your Outdoor Kitchen
Once you’ve secured your grill, focus on stocking your kitchen with the essentials. Start with a simple setup that can grow as you need it.
Here are some must-have items to begin with:
- Counter space: At least one prep area to make cooking more convenient.
- Mini fridge: Perfect for drinks, marinating, and storing perishables.
- Storage: Weather-resistant cabinets for keeping tools clean and accessible.
- Accessories: Don’t forget BBQ essentials like tongs, grill covers, and extra grates.
As you get more comfortable, you can add luxuries like a built-in sink, pizza oven, or even a beverage station.
Step 5: Design the Layout for Maximum Efficiency
Just like your indoor kitchen follows the “work triangle” (sink, stove, fridge), your outdoor kitchen should have a flow that makes cooking and entertaining easy.
The ideal layout keeps the cooking, prep, and serving areas close but not crowded. L-shaped designs are popular because they maximize space and help define different zones. Island setups work well if you want to keep guests near the action around the grill.
As a rule of thumb, aim to keep your outdoor kitchen about 10 feet from your house. This gives you convenience while preventing smoke from drifting indoors.
Step 6: Add Final Touches to Your Outdoor Kitchen
Now comes the fun part: adding personality and flair to your space. Think about lighting, seating, and décor that create an inviting atmosphere.
- Install string lights or outdoor pendant lights for ambiance.
- Add weatherproof stools or lounge chairs for comfortable seating.
- Incorporate a Bluetooth speaker or sound system for music.
- Consider adding plants, especially herbs, to soften the space and give it a fresh feel.
Remember, an outdoor kitchen doesn’t have to be extravagant to be functional and inviting. Some of the best setups are the result of creativity, a modest budget, and a love for cooking outdoors.
By following these simple steps, you’ll be well on your way to creating the perfect outdoor kitchen for your home, one that will serve you for years of delicious meals and memorable gatherings.