Subtotal $0.00


Email :157
A kitchen island makeover doesn’t always require a full remodel. With a few simple upgrades, you can give your island a fresh new look. This post will walk you through how I transformed my kitchen island using wall paneling and custom trim for an elegant, timeless design.
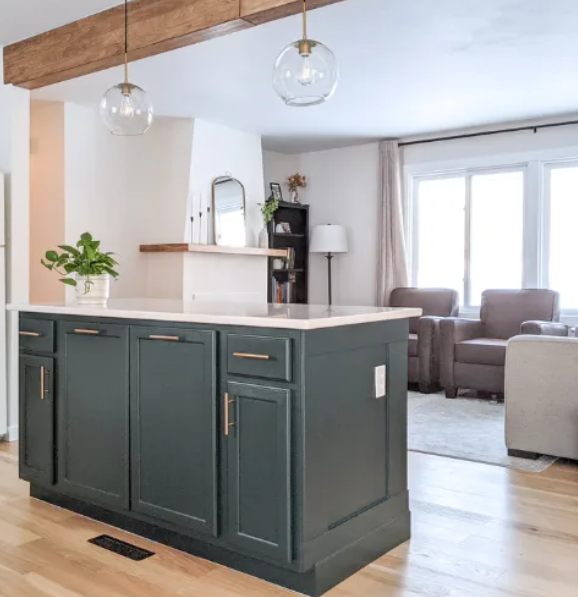
Before the Makeover
I started this kitchen update as part of a larger project to transform my builder-grade kitchen. Over the past year, I’ve done things like extend my cabinets to the ceiling, replaced cabinet doors, added a brass rail above the cooktop, and even added a cozy breakfast nook with built-in seating. The most recent upgrade was my kitchen island, which I decided to enhance with stained wall paneling.
Choosing Your Look
Before starting the makeover, I thought about the overall design and how I wanted my island to look. I envisioned it having the classic charm of an old English pub, with dark stained paneling and traditional detailing. I wanted the paneling to wrap around the island and extend to the base cabinets, creating a seamless, cohesive look.
Step 1: Gather Materials and Tools
Here’s what you’ll need to get started:
Tools:
- Table saw
- Miter saw
- Jigsaw
- Brad nailer
- Carpenter square
- Level
- Hammer
- Pry bar
- Safety goggles
- Sanding blocks (120 grit & 220 grit)
- Utility knife
Materials:
- 1/4″ smooth plywood sheets (4×8′)
- 1×4″ and 1×2″ poplar boards
- Decorative trim
- Picture molding
- Stainable wood filler
- Caulk (dark brown for staining)
- Wood conditioner or pre-stain
- Oil-based stain or paint
- Brushes/rags
Step 2: Remove Existing Baseboard
If your island has an existing baseboard or shoe molding, begin by removing it with a pry bar and hammer. Slice through any caulk with a utility knife to make the removal easier.
Step 3: Cut Plywood Sheets
Next, you’ll need to cut your plywood to fit the front and sides of the island. Make sure your cuts are strategically planned so that the seams are hidden by trim boards. I used 2.5 sheets of plywood for this project. You may need a helper to assist with cutting the large sheets using the table saw.
Step 4: Cut Out Holes for Outlets
If your island has outlets, use a jigsaw to create cutouts for them. Start by drilling holes in the four corners of the area where the outlet is located, then connect the holes using the jigsaw to make the cut.
Step 5: Attach Plywood Sheets
Once you’ve made all your cuts, nail the plywood sheets into place with 1.5” brad nails. Be sure to secure them firmly, but don’t worry about the corners—these will be covered with poplar trim later on.
Step 6: Install Decorative Trim
Cut your decorative trim to size and make 45-degree cuts to wrap the trim around the island. This can take a bit of practice, as I learned from my own trial and error! Stack your trims and secure them into place with your nail gun. For seamless joints, I recommend making 30-degree cuts when joining the pieces of trim.
Step 7: Add Box Moulding
Now that the trim is in place, cut your 1×4″ wood boards and install vertical boards evenly across the island. These should be about 20 inches apart. For the outer edges, extend the boards to meet the adjacent side, creating a clean corner without the need for mitered cuts. Then, add horizontal boards to complete the box design.
Step 8: Add Inside Trim for Extra Detail
For a more polished, professional look, consider adding picture frame molding inside the boxes. Cut and nail the molding at 45-degree angles for a clean finish.
Step 9: Prep the Surface for Paint or Stain
After finishing the paneling and trim, the next step is to prep the surface. If you’re staining the wood, fill in any nail holes and corners with stainable wood filler. Apply dark brown caulk to the top edge where the paneling meets the wall. If you’re painting, simply apply a fresh coat of paint and primer.
Step 10: Stain the Paneling
Staining can be tricky, especially with cheaper woods like birch. To get an even finish, start by applying a wood conditioner to ensure the stain absorbs evenly. I learned the hard way that water-based stain doesn’t work well on birch, so I hired a professional to strip the old stain and reapply a lacquer finish. For staining, it’s important to work quickly and wipe off excess stain within 5-10 minutes to avoid blotches.
Final Touches
Once the stain has dried, your kitchen island will have a rich, classic look. This DIY makeover gives your island a sophisticated, traditional feel without the expense of a full remodel. With some creativity and elbow grease, you can achieve a beautiful result that adds character to your kitchen.
FAQs
- What type of wood should I use for my kitchen island makeover?
For a smooth finish, I used birch plywood, but for better staining results, consider using oak or maple. - How much does it cost to redo an island?
A simple upgrade with wall paneling or beadboard typically costs under $1,000. I spent about $700 on materials and $850 for professional staining, which saved me thousands compared to professional installation. - How can I add more storage to my kitchen island?
Extending the island can provide more storage by adding lower cabinets or additional counter space. - What are some budget-friendly ways to upgrade a kitchen island?
Pendant lighting, fresh paint, and updated hardware can dramatically change the look without breaking the bank.
Conclusion
With a little effort and some careful planning, you can completely transform your kitchen island with custom wall paneling. Whether you choose to stain or paint, this DIY project will add timeless charm and character to your kitchen, making it feel like a truly custom space.